
New Headers – No More Hugging

After over 20 years with the original hugger headers made by Mike The Pipe in England I had to get new headers –
Trip Around the Country – 41 days – 12,000 miles

The story behind our 41 day 12,000 mile trip around the U.S. The good, the bad and the damn it!
Trip Around The Country PICS

Here are some pictures we took while on our 41 day 12,000 mile trip around the country. We had a blast, met some great people and had a wonderful time.
2011 – Rebuild

Tim Warner did the body work and did a great job. Floors were worse than I thought they would be – the hole in the top leaked much more than I thought so, new floors on both sides, rockers, and more.
Oil Filter Placement

Where and how my oil filter is located. It is a MOCAL remote oil filter head using the side inlet/outlets –
First 300 Mile – a review with 23 years later comments

And now with my comments 23 years later –
Transmission, McCleod Bearing, Rear End

Current transmission is a Borg Warner T5 – not world class. Originally I used the tranny Mike picked out – a T50-5. It was from a 1975 Pontiac Sunbird V6 with a 231ci engine.
Hyperspark

First the TBI – In 2018 I put on the Holley Sniper EFI. I love it, works great. I know a lot of the Youtube Carb vs EFI run dyno test
Battery Charger Multiplexer

Living in the North East if you have an older car or a boat, or lawn mower or other vehicle that starts with a battery that you don’t drive or use in bad weather
Radiator and overflow tank

This was the mounting of things when I had the Buick engine. Now with the Oldsmobile engine the alternator is on the other side and I have a different overflow tank and aluminum radiator. mounts25mounts26mounts28photo9photo10
Putting it together

My daughter, son-in-law and I putting the car back together after the new paint job. As a reward they got to be the first to drive it all together for the first time. booth1jc1jc2jc3jc4jc5jc6jc7jc8
Pre-Paint prep – the second time

In the paint booth prepaint2booth3booth4abooth5booth6booth7jackmgbbprepaint1
Mystery Parts

While putting the car together the first time I ran across these parts. Couldn’t find out from the parts catalog what they were and we’d could figure it out so I posted this online. By the time I found out the went under the ends of the windshield they had already been welded in as radiator supports. Still there, work great. image14
Motor Mounts

These are the old motor mounts – need to put in stiffer mounts so the engine doesn’t move around so much. mounts03mounts23mounts01mounts05mounts24mounts18mounts10
Magazine Articles about V8 Mg's

Older (1975) magazine articles about engine swapping – Aluminum V8’s in MGs and Vegas. These are quotes from Perterson’s Complete Book of Engine Swapping No. 4 available at Amazon.com – https://www.amazon.com/Petersens-Complete-Book-Engine-Swapping/dp/B000ZG4HGM covermg-1mg-2vega-1vega-2
Header Pics
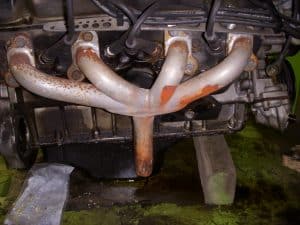
Pics of the headers – taken during the 2010 rebuild. These had been Jet-Hot Coated. I took them over to Scottsville and had them Swain Coater – ceramic coating.
The Original Tach Circuit – the electronic one

What it does – Signal from the points goes into the 1k resistor at the left. 1 uf capacitor and 12v zener clean out the spikes from the ignition to a rather clean 12v pulse. CD4011 further cleans the pulse to a good looking squared corner pulse. CD4013 is a flip flop – it takes the incoming pulses and puts out 1 pulse for each 2 pulses that come into it. First it flips – then it flops. The first pulse in makes it go high, then the next pulse makes it go low – essentially dividing the incoming signal […]
Tach 4 cylinder to 8 cylinder conversion (or adjustment)

Here are some updated pictures of how to be able adjust the tach to read correctly for 8 cylinders. I soldered a 10K pot from pin 4 to pin 7. With that you can adjust it so the tach reads correctly for an 8 cylinder vs 4 cylinder. pins-1-through-4-caps-movedpic1afront-viewback-view-with-case-onshowing-pin-1-of-the-chip-copypins-5-through-8pins-1-through-4-with-mug
Getting Reassembled – Dynamax sound deadening

Various pics putting it back together. I did use dynamax through out the car. 2011-10-13_14-43-12_3802011-09-21_15-39-55_1652011-12-14_13-07-57_8092011-12-14_13-07-34_5902011-08-29_15-38-45_9182011-12-14_13-10-09_6902011-12-14_13-10-55_8202011-10-14_17-46-18_7302011-08-29_15-32-47_4832011-12-14_13-09-54_7712011-12-14_13-14-24_9802011-08-29_15-39-11_3192011-10-17_18-10-48_4132011-10-20_17-45-51_882011-08-29_15-38-19_392011-08-29_15-33-35_9582011-12-14_13-35-25_9882011-10-13_15-57-21_4602011-12-14_13-08-56_8302011-10-19_17-22-08_4852011-10-14_17-47-03_3602011-10-06_15-19-17_3922011-10-19_17-40-38_892011-10-09_13-20-56_7822011-10-19_17-39-37_7442011-09-19_19-08-46_1572011-10-13_14-50-07_7992011-09-19_19-09-10_1652011-09-19_19-08-56_7992011-12-14_13-14-48_318
Getting Rebuilt – March 2011

March 2011 – time to rebuild and change color. I decided to go from black to Chrysler 300 Vanilla and added a hood scoop. The scoop is from a Chevy S-10 pickup. I also put dynamax sound deadening in where every I could. The whole interior tub is lined with it and I put as much as I could reach inside the door panels. It does make a difference.
New (2011) Paint Job and Interior Finished

Changed the color to Chrysler 300 Vanilla – an off white. Stayed with the black top. img10img11img12img13img14img15img16img4img5img6img7img8img9
Manifold Stuff

First time the headers (made by Mike The Pipe in England) where plain. Then I had them Hot Coated out in Nevada. Then I had them ceramic coated at Swantech in Scottsville. In 2017 I wrapped them with lava wrap. That made the biggest difference. I was getting over 400′ up in the engine compartment and around 250′ down the exhaust just after the bend. After wrapping the temps pretty much reversed themselves. mounts08mounts06mounts07
Clutch related Pics

Here’s a couple pictures of my clutch after the ring gear slipped. The flywheel is aluminum with a steel ring gear. It had set screws. Over time the ring gear had gotten lose. Took it out and Dan at Kurts put new (larger) set screws. mounts02mounts04
Holley Sniper TBI 2300

Holley Sniper 2300 TBI Off and on over the years I have been playing with various types of Throttle Body Injection (TBI). TBI just runs better. Smoother acceleration, more “punch”, quicker starting and I notice more torque in the 2000 and up range as well as that the engine feels like it wants to keep going up to 4500 without waning. My first one was a Holley analog tbi. A 2 barrel I found on Ebay. It used the existing temperature gauge, a feed from the points and it used a 12lb fuel pump. I had a couple different variations […]
holley-throttle-body-fuel-injection-round-1

Here’s some pics from my first round with the Holley throttle body injection.
General Pics

m_mvc-009bm_mvc-008bm_mvc-001aimage12image11image03side2side1photo11image13mvc-006fmvc-021fmgb2-aleonsmgb-dash2012-10-18_12-33-27_70
Blown Spark Plug

The car blew a spark plug. One of the Autolite 303’s blew out. My grandson Preston and I were on our way back from the track to Seneca Lodge and when we turned the corner into the lodge heard a POW and then some really different noises. We pulled into a spot right in the front and opened the hood only to see that plug number 6 just blew out of it’s hole. Went to Napa Auto Parts, got a helicoil repair kit. Loaded the bit up with grease to catch the metal chips and installed it in the Seneca […]
My First Car Show with the MG

It was a rough day weather wise – but I took second place at my first car show with the MGB. I was ok with that. It was at the Victor High School, by the MG Car Club. cs6.jpgcs4.jpgcs2.jpgcs7.jpgcs1.jpgcs3.jpg
Gt6 We Had

These are the pictures I used to sell the GT6 we had. I bought it from Foreign Auto when they were on University Ave. The rebuild was done very well, it ran great but the car was just too small for me. Or I was too big for it. You choose. dipstick.jpgleftfrontfenderwell.jpgrearendundermuffler.jpggaugesonright.jpgrightfrontfenderwell.jpgrightfrontcar.jpgenginehoodup.jpgspeedometer2.jpgleftfrontcar.jpgrearend.jpginsiderear.jpgleftrearunder.jpgunderfromfront.jpgunderfromside.jpgexhaustpipes.jpgenginetop.jpgenginelefttop.jpg
Throttle Body Injection – Pro-jection by Holley

This was the first TBI I tried out. It was a Holley Pro-Jection 2 barrel. It’s rated at 650 cfm. It was a very big improvement over a carburetor. Started quicker and just felt much better – especially in the mid range. Another very noticeable thing was the lack of gasoline smell after the car is parked in the garage. Along with that is the heat soak problem. Sometimes on real hot days it would be hard to start and sitting in a construction hold up or when crossing the border in and out of Canada. Hit it just right […]
First Car Show – 2nd place
June 1998 – I entered my first car show – the MG Car Club Sports Car Festival held at the Victor High School. I got 2nd place. Pretty cool. I think the fact that it was probably the first v8 conversion in the area didn’t hurt either. cs7.jpgcs1.jpgcs8.jpgcs6.jpgcs4.jpgcs2.jpgcs3.jpg
Engine Compartment after engine pull for Rebuild 11-2010

Engine compartment after the engine pull for the rebuild – 11/2010 dscn0486.jpgdscn0485.jpgdscn0484.jpg
Dual Exhaust – Centered gas tank

Dual exhaust pics – I just love the sound of duals. Dan centered the gas tank then I took it over to the local shop and had them fit the pipes and mufflers. Nothing beats the sound and feel of a V8 with duals. p5010021.jpgp5010020.jpgp5010019.jpgp5010018.jpg2012-05-30_19-27-55_317View inside my gas tank – got a viewer from Harbor FrieghtThis is how the gas tank filler neck was moved to accommodate the centered gas tank – which was centered to accommodate the dual exhaust. Sometimes life is just about accommodations. p5010024.jpgp5010022.jpgp5010023.jpg
Clutch & McCleod Throw Out Bearing

Clutch & McCleod Throw Out Bearing New update – with the last engine pull I went back to a hydraulic throwout bearing – used a Howe hydraulic from Speedway – works great. Also moved the point where the master cylinder connects to the clutch pedal to increase the throw of the pedal wich also decreases the pressure needed to use the clutch. Put over 20k miles on it and it works great. update – no longer using it. What happened, and it may have just been mine, but when it was parked for months -something that happens each winter here […]
Carburator, Air Filter pics

Carburetor, Air Filter pics. This was before I really understood what/how the engine breather system worked. I thought there was enough vacuum in the air cleaner to pull air through the engine. Turns out if your air cleaner is in good condition – there isn’t much vacuum at all. I’ve since figured that out and now vent directly to the manifold/carb depending on which setup I’m using.
Indented Rear Wheels

The rear end is from a Chevy Monza Vega. It’s positraction and just about 3″ wider than the original MG axle. To compensate for the extra width I had the center of the wheels taken out and re-welded out 1″ on each side. “Normal” wheel My rear wheel after indenting. Designed and Hosted by Zaks.com
Carb Pics – Carter 400 AFB

The first carburetor I put on the car was a Carter 400 AFB. The nice thing about a carburetor is if it is new or in good shape you can count it to get the car going and you can put your time into trouble shooting other bugs – ignition, fuel supply or whatever. The problem with carbs is that they most of the time deliver a close mixture which is usually off a bit in parts of the rpm curve. So often I’ll get behind a beefed up muscle car and it smells like a gas station when you’re behind […]
Blown Rear Main Seal – 2004
I noticed a bit of an oil leak. Normally on an MGB with the original engine this would be considered normal, but, having the Buick v8 in it – it wasn’t normal. I figured out it was coming from the rear main seal. I was driving along one day and the oil pressure dropped right down to 0. I pushed the clutch in and reached to turn it off but by the time I could do that the pressure was back up again and everything looked normal. Turns out that there were some small score marks on the rear main […]
A Better Tach Circuit

Here’s more information about adjusting the MGB Tach to work with a V8 or a V6. This is looking at the back of the tach. After you remove the front bezel by rotating it till the tabs clear the body. Turn the tack over (carefully – don’t bend the needle) and remove the screws highlighted in green – leave the red one alone. Here’s a view of the potentiometer I used – tit was a 100k but – i’ve now measured the resistance it’s set to – it’s 46.3K.So you could use a 47k resistor and not bother with the […]
215 Specifications and Information

Torque Specifications Year Engine Spark Plug Cylinder Head Bolts Intake Manifold 7 Exhaust Manifold Rocker Arm Shaft Bracket Rocker Arm Cover Connecting Rod Cap Bolts Main Bearing Cap Bolts Flywheel to Crankshaft Vibration Damper to Pulley 1961-63 F-85 12-17 45-55 25-30 18-24 45-55 3-5 30-35 50-60 2 85-95 140-160 Designed and Hosted by Zaks.com
New Exhaust

This is something that happens.